
Some general tips applying to all metal work/replacement:
========================================================

1) Take your TIME!
2) NEVER weld on a rusty or painted workarea!
3) Use A FEW pop rivets to hold panels in place for welding!
4) SEAL off your work meticously!
5) Keep FAITH in yourself!
6) Buy the panels BEFORE you start welding!
7) Have a PLAN before attacking a problem.(sketches, explode diagrams, etc)
The path is (often) long, but when we reach the end of it it will be worthwile. It is time to start the metalwork.
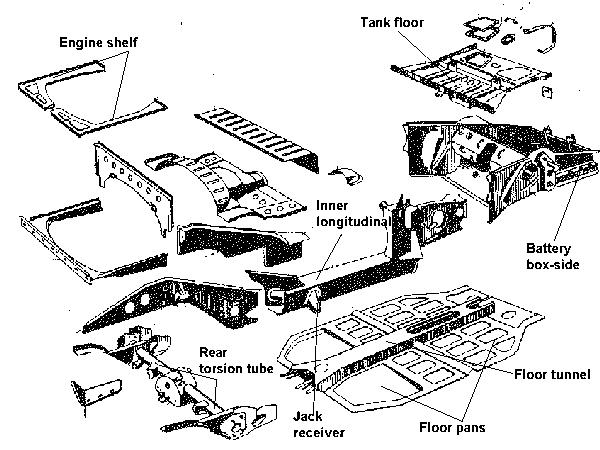
We better start with the longitudinals, these are almost always rusted away. They also act as very important structural pieces and are important for the stiffness of the chassi. We should remove one at a time to limit the chance of the car sagging and changing measurements.
If you have the rotisserie or something similar, tilt the car over so that the bottom is up. If you don't have you will have to jack the car up as high as possible on the side you will work, keeping the other side on the ground. Start to cut around the outer edges of what is left of the old longitudinal. The longitudinal is welded to the inner longitudinal, the door step assembly and the front and rear closing panels. Cut out as close to the edges as possible. If some places are missing, rusted away that is, make some measurements as where to install the replacement panels BEFORE you remove the old longitudinal. You can use parts of the old stuff to determin where to weld in the new stuff. You should be working with a cutting tool during this, either pneumatic or electric.
There is also a possibility to drill out spot welds, this is often difficult as the old spots are somewhat difficult to see, and the corrosion often distorts the area so that it is impossible to easy and convenient dril out the spotwelds.
Having removed the most of the longitudinal, it is time to grind down whatever was left of it. Grind down the areas which seem to be the weld points, even if you miss a few you will soon get the idea of where to grind. By applying a little pressure and grinding on the spot, you will soon be able to 'rip off' the left over material with a plier or screwdriver.
 1)
                                            | |   <--- grinding wheel
                          spot welds        |_|
  --------_----------_-----------_-----------_-----------_-
  ---------------------------------------------------------

 2)

 ------    --------   --------     --------    ---------
 -------------------------------------------------------

 3)
                                      /
                                     /      <--- tear this off
 ------   -------     ---------     /
 --------------------------------------------------------
Having removed the longitudinal complete you should now be able to tell whether you must replace the lower part of the inner longitudinal or not. You will also be able to determine whether you will have to replace the longitudinal supports and the heater tubes or parts of them. Most likely the reinforcements are gone, hopefully the somewhat thicker heater tube is possible to use, as it is a little more tricky.
If you will have to do the whole package, supports, tubes, inner longitudinal, just cut out the old crap and clean out the area. Draw a few sketches to memorize the layout. Clean out the longitudianl area with a wire brush attached to the grinder when everything is removed.
Start with replacing the inner supports, these can be made, but the cost shouldn't scare you from buyig them either. Use the wire brush to get to bare metal where the support piece is going to be welded.
The piece itself is very handy for positioning of the inner longitudinal lower 2-4 inches too. It should be flush with the bottom of the inner longitudinal. Now use your flange/punch tool to make holes in the support piece, these are for spot welding through. Be sure to grind off any primer that will interfere with the welding before you start fitting your new piece.
Use self locking pliers to adjust the position and spot weld the piece to the inner longitudinal. About 1 inch between each spot will insure a strongly attached piece. Use the same methode with the other piece too, if neccessary.
After these are fitted it is time to start on the heater tube itself, if you have the tools for more or less advanced pipe welding, go ahead and measure angles and dimensions and make a new tube yourself. if the old heater tube is possible to repair you should better patch this one as this is much easier, and remember you will not have to look at it afterwards. The important with this repair is to get everything thight, no holes or leaks and rust proof it with lots of rust mort or other rust preventing means.
If you do the tube repair after the support repair you might, depending on whichever model you have, separate the heater tube to install it. This is easy and a good rubber hose with stainless steel clamps will be good enough for closing the gap afterwards. The point where the heater tube enters from the engine bay area is rather difficult to repair, and you can come a long way by patching the old tube and finishing it off with any kind of sealant, fill the channels with rust preventives too.
With the inside of the longitudinal finished it is time to start at the inner longitudinal lower couple of inches. Examine and determine how much you want to replace. Be sure you have cut away enough to get sound metal for the welding of the new lower part. This repair patch is made out of ordinary sheet metal which have had a 3/4 inch flange made to it in 90 degree angle. Every sheet metal shop can do this job and I found this to be much cheaper than the repair kits. Take the repair piece and draw a line on the inner longitudinal, decide whether you will want a flush overlap or not. A flush overlap will be nicer and minimize the chance of rust starting inbetween the panels. If you want the flush overlap you will need to use the flange tool to put a step in either the repair section or the inner longitudinal. Then make holes for spot welding the pieces together.
It is also time to cut away half the floor pan. Cut around the perimeter on the side you are working, leave an inch in the front, the rear and towards the tunnel intact. Jump inside the car and shout Jabba-dabba-doo, because it gets much easier to work from this position.
With the help of self locking pliers you can now start repairing the inner longitudinal lower inches. Be very patient when you are putting in the new pieces as this will insure easy and correct installment of the new floor pan afterwards. When you have repaired all the sections that were necessary it is time to start thinking about instaling a new longitudinal. Before you think of this, there are a few places you will have to check and possibly work first. Move to the inside of the longitudinal again and spot weld the flange between the repair piece and the inner longitudinal, you shouldn't have to put the spots too close but say about 2 inches between each will do. This to insure the strenght and rigidity of the new longitudinal.
If you have to install new sills this is a task that should be done while changing longitudinals. The longitudinal goes in between the sill arrangement to be welded together. There is also a short threshold sill which could be rather bad. Check this one and plan to change it while you're there.
If your sills are decent and don't need any repairs, you should put a flange in the upper area of your new longitudinal. You must install the new longitudinal to the sills inner area, as you will not be able to get to the original welding area. But this is common and accepted when changing longitudinal in a 356 so dont hesitate doing it.
Everything lined up and cleaned and it is time to install the new outer longitudinal.
You should now use the punch tool again and make holes for spot welds in the longitudinal. If you are replacing the sill you must make holes in the upper straight edge of the longitudinal, if not you will have to make a flange approx 2 inches down on the upper edge, leaving about 3/4 inch left to insure a good mount to the chassis. With everything punched and ready for installment get out the self locking pliers again. Fix the longitudinal to the repaired inner longitudinal, lock it up in the front and rear closing panel area.
Start spot welding the upper area first, 2-3 inches between the spots. Then move over to the inner side. Loose the pliers and 'drag' the longitudinal towards you, put a few spot welds in through the holes you surely made in the repair piece on the inner longitudinal. Thus fastening the inner to the outer longitudinal. Weld more spot welds to this section, promptly joining these together. With the longitudinal securely fitted it is time to think about the contrary side. Use exactly the same method to fit the other longitudinal.
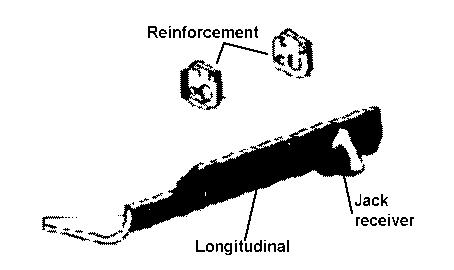
If you are careful with the fit, you do not need to install jack receviers before you install longitudinal, but it is of course possible and could save you from unpleasant surprises. The jack receivers are somewhat expensive, but I'll describe a method of making your own later in this book.
When you've finished the longitudinals, it is time to get to the closing panels. In the front wheelhouse there is a inner closing panel, this is a flat panel to be welded before the contoured front closing panel is going in. This panels closes the longitudinal in front and also closes towards the door.
This panel is easy to make, and you should be able to fabricate one. Punch holes in it at the outer perimeter, and fix it to the car. Spot weld it, and voila, it's finished! That was perhaps the easiest panel of them all!?
If you have to do repairs to the front wings, you might consider repairing the front closing panels later, but if only the closing panel is rusty, you should replace it now. If replacing the whole piece, you either have to be Houdini jr., or have to do it with removal or replacing of the rear of the front fender.
If only the lower part is gone, turn towards the fabricate section, and make a repair piece. Otherwise you will need to buy one to get it correct. Make holes for the spot welds and with pliers lock it to the fender, and ........ yes, spot weld it!
Rear closing panels. These are also darn easy to fabricate, a bit more difficult to install, but as I noticed not as difficult as they first looked to be. After the piece is made up, punch holes, lock it, weld it!
Patching fenders: the Danish repair panel I used is huge, it covers the area from the front windshield all down to the lowest parts of the fender, and about 40 cm into the fender (forward). If I should have payed for what I used, I'd get a 70% rebate :-) I cut out the rotten part of the old fender, and put the repair panel in place. Then I marked off the area I needed of the repair panel from the inside of the fender. Just remembering to include 1/2-3/4" for the overlap. Cut out the piece with a nibbler.(....which leaves a very nice edge) Once cut out I put a flange in the edge where the overlap was going. turned the tool and made punches for spot welding. Trial fitted with the door in place.(....remember door gaps) Marked off the exact location.
The rear of the repair patch has to be bent around the closing panels flange. I just took the metal snips and made cuts in the repair pieces flang so that the bending of these would be easy. Perhaps a Door-Skin plier could do this job better....? Spot welded the piece, used an ordinary but big plier to bend the edge on the repair piece. Use a wooden piece, slightly concave, on the outside when bending the edge inplace. Got a few small distortions, but I'll be leading them.
Quite easy really...!
Time to think about the battery box. The battery box is made up of a floor, front, rear and side walls. Very often these are rusty, and most often it is only the floor that is bad. But it is not unlikely that you will have to make 1/2"x1/2"(90 degrees) repair pieces for the lower parts of the side walls. Start by cutting out the old floor. Just cut along the edges. If you prefer removing spotwelds, go ahead and drill them out. Clean up the angled supports at the bottom of the walls, (the ones you might have to restore) and get a clean surface before mounting the floor.


Trond Vidar Olsen
1994
teveo@zwapit.com